Share

Saturday, May 28, 2011

Golden Beet Salad

We are very lucky to have a local farmer's market very close to our place.  It always feels good to be able to pick up fresh organic fruits and veggies.  Cy loves beets so we tend to include them in our grocery list fairly often.  I personally like the red ones but they seem to scare Cy (especially when visiting the ahem, you know where).  


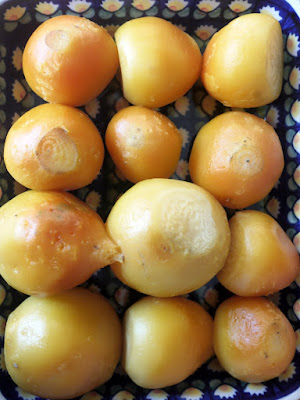
Whenever I come home with beets I try to immediately cut off the leaves (for later use) and throw the roots in the oven to roast so that I can use them during the week.


Add water, cover with foil, and roast about an hour
at 350F in the oven

....and voile! the peels come off easily

This time I made a simple salad using red onions and some of the apple mint growing on my balcony.  The tart vinegar really brings out the sweetness of the beets.  It's like nature's candy!


This is just one of those things that I throw together so there is no formal recipe.  Everything is fairly approximate and flexible.  I think you can throw some orange slice in there if you felt like it, use shallots instead of red onions...it's great because you can adjust according to what you have on hand.

Golden Beet Salad

Ingredients:
(Serves 4)

A bunch of Golden Beets...approx 6
White Wine or Sherry Vinegar...2-3tbsp
Extra Virgin Olive Oil...2-3tbsp
Minced Red Onions or shallots....1/2c 
Mint Leaves...8-10 leaves
Salt & Pepper...to taste
feta or goat cheese..optional

Directions.

1)  Preheat oven to 350-400F.

2) Cut off stems off the beets, give them a good rinse and place them in a baking pan filled with just enough water so that it covers the bottom of the pan.

3) Cover with foil and roast for approximately an hour.  Pull out of the oven and let it cool until ready to handle.

4)  Once cool, the skin of the beets should come off pretty easily.  (sometimes it helps to do this under running water)

5)  Slice Beets and toss with vinegar, oil, onions, mint and cheese.  Add salt and pepper to taste and ENJOY!

**You can just prep the beets ahead of time (steps 1-4) and keep them in the fridge for up to a few days until you're ready to use for the salad, or whatever else you feel like making.






Thursday, May 26, 2011

The Go-to Banana Bread

This is THE banana bread recipe I use whenever I have overripe bananas.  It's from one of my favorite baking sites.  While I realize that a carb is a carb no matter how you try to spin it for a diabetic, I tried to adapt it so that it's as healthy as I can make it while maintaining it's moist banana-y goodness so Cy can enjoy some too.


Before
After

 Banana Bread Recipe:
adapted from TheJoyofBaking website


Ingredients:

Whole Wheat Flour...1C
Almond Flour...1/2C
Flax seed meal...1/4C
sugar (splenda or other sugar alternative)...1/2C
cinnamon...1tbsp
Baking powder...1tsp
baking soda...1/4tsp
salt...1/4tsp
Eggs...2
melted butter (or coconut oil)...1/2C
vanilla extract...1tbsp
Ripe bananas...3
Nuts (anykind- I use walnuts or pecans)...1C

Directions:
(Makes 1 9in loaf pan)

1.  Preheat oven to 350F. Toast nuts.

2.  Mix all dry (flours, flax seed meal, cinnamon, baking powder, baking soda, and salt) ingredients together in a bowl.

3. In a separate bowl, mash bananas, mix in melted butter, sugar, mixed eggs, and vanilla extract.

4. Add dry ingredients into the wet and mix with a spatula.  IMPORTANT- don't overmix!  The batter can be clumpy NOT smooth, we don't want to overmix the batter which makes for rubbery bread.  Gently mix in your nuts.

5.  Pour batter into a parchment lined (or sprayed) loaf pan.

6. Bake for about 55-60min.  Check to see if a toothpick comes out clean.


Monday, May 23, 2011

Impromptu Indian night

We have an amazing place called the Naan Hut in our neighborhood.  So when some friends suggested doing curry for dinner, we immediately thought of this place and their HUGE sheets of warm soft bread.  They ONLY make this bread and it's all made to order, and I have to admit that on the way back to the car a good chunk of the bread may have disappeared... ;)  Even Cy who generally avoids bread took some healthy bites.

In anycase, I've been wanting to try out a curry recipe from this book for awhile now so this was the perfect opportunity. The author is a half Japanese-half Indian model whose Father is an Indian chef.  Apparently, this recipe was one handed down to her from her Grandfather.  All of the recipes in her book look healthy and delicious, a great mix of Indian and Japanese food - a combination that you don't see very often.


Our friends made some grilled eggplant and cauliflower with some yogurt sauce flavored with cumin and fennel seeds.  It was delicious! A reminder that veggies can be amazingly good with just simple preparation.


The curry recipe turned out to be a hit and was also very simple to prepare.  There is a long ingredients list but hey, it's Indian food.  It's great to have all of these spices on stock anyway.  In fact you can just premix the spices ahead of time so that you can whip up this curry whenever you feel like it.

I feel like curry is such a great way to incorporate all the great spices like ginger and tumeric into your diet.  I seem to remember reading that tumeric has numerous health benefits, including helping to control your blood sugar...I will have to read up on this...

Indian Curry Recipe:
adapted from Kumazawa Chie no Genki Recipe

Ingredients (Serves 3-4):

Chicken Thigh cut into pieces... 500g
Minced Garlic... 1 tbsp
Minced Ginger... 1tbspd
Onion (chopped)... 1
Olive Oil... 1 tbsp
Tomatoes(chopped)... about 4 Romas
Water...1C
Plain Yogurt...500g (we used a Russian yogurt)
Cardamom...2Tbsp
Ground Coriander...1.5Tbsp
Cumin...1.5Tbsp
Tumeric...2tsp
Ground Cloves...1.5tsp
Paprika...1-2tsp
chili powder...1-2tsp
Cinnamon...1tsp
Cayenne pepper...1tsp
Salt...to taste

Directions:

1.  Heat the olive oil in a large pot and cook onions along with garlic and ginger until onions are translucent.

2.  Add the cardamom, stir.  Add the tomatoes and cook until the tomatoes break down.

3.  Add the rest of the spices, water, and chicken thighs.

4.  Add the yogurt and cover and cook on low-med heat for a couple of hours.

5.  Adjust spices and add salt to taste, and serve.


This guest made sure to keep an eye on the table the entire time :)

Wednesday, May 18, 2011

Wannabe Korean soup...or at least it's soup made by a Korean

Today I thought I would pick up quick tacos for dinner...this is something that almost never happens.  Not that I don't enjoy the occasional taco, but you would just never hear me say 'hey, let's go get some tacos'.  I thought that Cy would be overjoyed that I was willing to indulge in some Mexican fare, but no, he tells me he's in the mood for some hot soup, of course.  Life is never easy.

Since we had some Daikon (Japanese radish) on hand, we set out to make Cy's favorite childhood dish, Moo Gook - or Korean radish soup.  It was supposed to be something like this, but since we realized that we didn't have a lot of the ingredients, decided to wing it instead.  We cooked the beef with some garlic and ginger, then used a vegetable broth base, and added some enoki mushrooms and kale we had on hand to amp up the nutritional value.

As a side note, here's an interesting tidbit in regards to enoki mushrooms.  One of the towns with the lowest occurrence of cancer in Japan is also the largest producer of enoki mushrooms.  And as it turns out, most of the families that live there consume large quantities of enoki mushrooms at almost every meal.  Of course there are probably other factors that contribute to the town's good health, but mushrooms in general have been studied in depth (especially in Japan) and most researchers seem to agree that they are beneficial in the prevention of cancer.

In any case back to the soup! Though not quite the traditional korean soup, it was still delicious and perfect for a chilly night.

Monday, May 16, 2011

Weeknight Quickie

Made a really simple meal from here as we both got home late tonight.   Love these kind of recipes that are so quick to prepare but still tasty AND healthy.

Cashew Salmon with apricot whole wheat cous cous (and some quick steamed green beans on the side)...


Cashew Salmon with Apricot Couscous
From EatingWell Magazine

Ingredients:

1/2c nonfat plain yogurt
3 scallions (greens and whites separated)
2 tbsp lemon juice
2 tbsp chopped cilantro
1/2 tsp ground cumin
3/4 tsp salt
1/2 tsp ground pepper
1 tbsp extra-virgin olive oil
1/4 c dried apricots
1 tbsp minced fresh ginger
1 1/4c water
1 c whole wheat cous cous
1 lb of salmon fillet
2 tbsp toasted chopped cashews

1.  Preheat grill to medium-high or position rack in upper third of oven and preheat broiler.

2. Combine yogurt, scallion greens, lemon juice, cilantro, cumin, 1/4 tsp salt and 1/4 tsp pepper and set aside.

3.  Heat oil in large saucepan over medium heat.  Add apricots, ginger, scallion whites, and 1/4tsp salt.  Cook, stirring, until softened - about 2min.  Add water and bring to a boil over high heat.  Stir in couscous.  Remove from heat, cover and let stand about 5 min.  Fluff.

4.  Rub salmon with the remaining 1/4 tsp salt and pepper.  If grilling, oil the grill rack.  If broiling, coat a broiler pan with cooking spray.  Grill or broil the salmon until browned and just cooked through- about 3 min per side.  Serve with couscous topped with yogurt sauce and cashews.

Isn't this the quickest recipe?  Let me know how yours turns out!
  •  

Related Posts Plugin for WordPress, Blogger...

  © Blogger template Shush by Ourblogtemplates.com 2009

Back to TOP