Showing posts with label savory. Show all posts
Tuesday, September 25, 2012
{Caramelized!} Caramelized Black Pepper Chicken & Caramelized Broccoli
These two dishes are from Food & Wine's Best Fast Recipes list. A very helpful list on those days you want to whip up something delicious without slaving away in the kitchen. Both use the process of caramelization to bring out the flavor of the ingredients...so there's no way it could taste bad! {unless you burn it of course ;) }
Both recipes are simple, but extremely flavorful, and has gotten the thumbs up sign from Cy. Our good friend M proclaimed that he could get hooked on this dish. So I hope you guys get a chance to try making the dish!
Thursday, September 13, 2012
{Sweet Roots} Sweet Potato, Carrot & Ginger Soup
One of my favorite people got married this past weekend, and I feel very honored to have been her MOH for her special day. Everything was beautiful and all of the little details perfect. Thank you so much to L&J for sharing your ♥ with us.
Here is a recipe - sweet & easy just like you guys L&J :)
There's been a lot of root vegetables like Sweet potatoes and Carrots in our Produce box lately and I debated over what to make with them. Root veggie baked chips? Muffins? Tarts? So many options, so little time! In the end, I decided to go with this Sweet potato, carrot & ginger soup. Mainly because I knew it would be quick and easy, and of couse nutritious and delicious as well. A recipe that would fit perfectly into the rotation on those days you don't really want to spend too much time in the kitchen. The ginger perfectly balances the sweetness of the potatoes and carrots, and the addition of cumin and nutmeg add just enough warmth to make it a perfect comfort dish.
I almost always start my soups with this trifecta of ingredients - olive oil, onions, and garlic/ginger. Then add whatever main veggie you plan to use, add stock, season, and voila! A healthy meal with hardly any work (Except peeling the sweet potatoes...I do not enjoy having to peel vegetables...)
Friday, August 17, 2012
Arugula & Walnut Pesto with Summer Squash
I've always had a thing for Arugula. There's something I find really attractive about that very distinctive aromatic flavor, but maybe it's not for everyone because apparently Cy does not find arugula very tasty.
Which is really unfortunate because like most other dark green leafy vegetables, it's packed with amazing nutrition like Chlorophyll, and is best eaten raw (or a cooking time of within 5min or so).
Here's the science tidbit- Chlorophyll has a biochemical structure just like red blood cells, except it has a Magnesium center versus an Iron one. When you cook arugula (or any other green veggie), the Magnesium center is replaced by Hydrogen, turning the bright green color into a dull one (So interesting isn't it!?) The loss of Chlorophyll means you're losing out on all of its possible anti-cancer properties. The wholefoods site actually has a great article source list here.
As much as Cy does not like arugula however, he really enjoyed the arugula pesto. So this dish might be a great way to get the benefits of raw arugula, even for the non-arugula lover. And the fact that it's with a "pasta" that's completely carb-free? Only an added plus. It's really perfectly refreshing for a hot summer day like the ones we've been having lately.
I used walnuts in the pesto, but you can always replace them with other types of nuts (pine nuts, almonds, etc). Whatever works for you!
| Freeze any leftover pesto in ice trays and save them for another day ;) |
Labels:
arugula,
gluten free,
low-carb,
pesto,
Salad,
savory,
vegetarian,
walnuts,
Zucchini
Thursday, August 9, 2012
Quinoa Salad with Almonds and Zucchini
Small round zucchinis and yellow bell peppers were more goodies from the produce box I mentioned earlier this week. I wanted a quick salad I could keep in the fridge for whenever I didn't feel like cooking, and this quinoa salad was the answer. Fast, easy, versatile, delicious, and healthy - what more could you ask for?!
AND...I was very excited to serve it off of one of the glass plates I made in the glass fusing class a friend convinced me to try out. As frustrating as cutting glass can be, I have to admit it's pretty fun to be able to eat off of a plate you've made yourself :) This shot is from my instagram account.
Labels:
bell peppers,
quinoa,
Salad,
savory,
Zucchini
Thursday, June 21, 2012
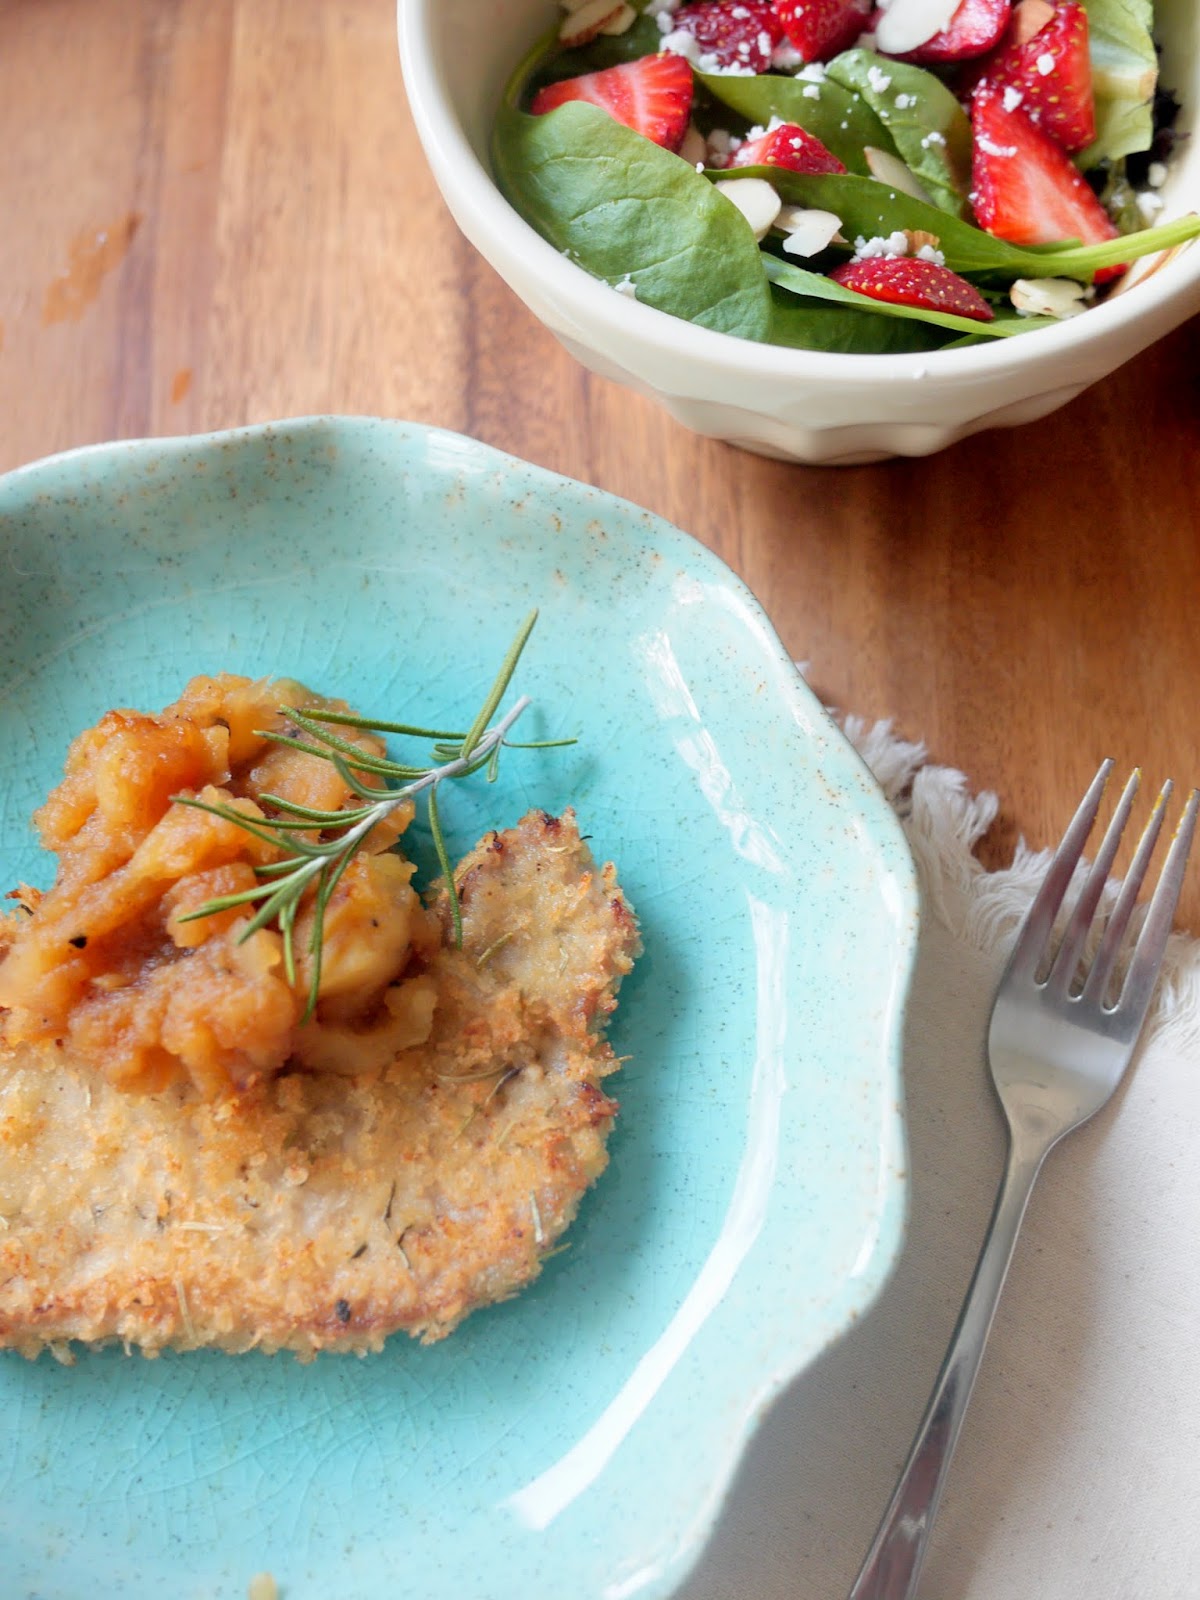
Weeknight Quickie: Rosemary Porkchops and Applesauce
This one is a real quickie, both post-wise and cooking-wise. It's my go-to recipe for porkchops, the one I keep coming back to for flavor and easiness. Perfect for a delicious weeknight dinner, even when you have the unexpected guest. The applesauce really makes the dish in my mind. Once you've had homemade applesauce you will never go back to any store bought kind. It's so easy to prepare, there's no added sugar, it's just apples and spices and oh so delicious!
Rosemary Porkchops and Applesauce
From Epicurious
Ingredients
Serves 4-8
{pork chops}
2 cups milk
3 teaspoons salt
8 (1/2-inch-thick) pork chops
3 1/2 cups bread crumbs (I used panko)
1 tablespoon minced garlic
2 teaspoons chopped fresh rosemary
2 teaspoons chopped fresh thyme
2 to 3 tablespoons vegetable oil
2 to 3 tablespoons olive oil
{applesauce}
3 lb mixed apples (any kind is fine depending on how tart you want it)
1/4 cup water
1 tablespoon cider vinegar
1 Turkish or 1/2 California bay leaf
1/4 teaspoon ground allspice
Directions:
3 lb mixed apples (any kind is fine depending on how tart you want it)
1/4 cup water
1 tablespoon cider vinegar
1 Turkish or 1/2 California bay leaf
1/4 teaspoon ground allspice
Directions:
1. Marinate pork chops: Stir together milk and 2 teaspoons salt in a shallow 3-quart dish, then add pork chops. Marinate, covered and chilled, turning over once, at least 1 hour.
2. Make applesauce while chops marinate: Peel, core, and coarsely chop apples, then stir together with remaining applesauce ingredients in a 3-quart heavy saucepan. Bring to a simmer, stirring occasionally, then reduce heat to moderately low and cook, covered, stirring occasionally, until apples are falling apart, 15 to 20 minutes. Discard bay leaf and mash apples with a fork. Keep applesauce warm, covered.
3. Preheat oven to 200°F. Stir together bread crumbs, garlic, rosemary, thyme, and remaining teaspoon salt in a shallow bowl.
4. Lift pork chops from milk 1 at a time, letting excess drip off, and dredge in bread crumbs, lightly patting crumbs to help adhere, then transfer to a tray, arranging in 1 layer.
5. Heat 2-4 tablespoons oil in a 12-inch heavy skillet over moderately high heat, then sauté pork chops in 2 or 3 batches, without crowding, turning over once, until golden brown and just cooked through, 5 to 6 minutes per batch. Transfer as cooked to a platter and keep warm in oven. Serve pork chops with applesauce.
Tuesday, May 22, 2012
A Pasta Primavera: Kabocha Gnocchi
I know that this blog is specifically titled "No Pasta for Penguins", but I decided to break the rule a bit with this recipe. We usually don't have pasta, not because there's anything wrong with pasta - I truly believe in the motto "everything in moderation", but it is a high carb food - something cy tries to avoid if he can so that he doesn't have to use as much insulin.
However, I've been wanting to try making Gnocchi out of the Japanese Kabocha squash for quite sometime now. It's true that winter squash tend to be a high carb vegetable, but research now reveal that not all carbs are made equal. Much of the carbs in winter squash come from polysaccharides in cell walls including specially structured ones called pectin. These components have been found to have anti-inflammatory, anti-oxidant, as well as anti-diabetic and insulin regulating properties. You can read more about it here or here
This Gnocchi, made mostly with Kabocha and some wheat flour, is filled with good-for-you carbs, not to mention super simple to make and delicious to eat. It's wonderful on it's own, and I thought about just tossing it in some lemon and sage sauce or something, but decided to make a primavera out of it instead. The added chicken increases the protein content and different roasted veggies add a wonderful contrast in consistency to the gnocchi, making for a perfect light lunch or dinner.
Kabocha Gnocchi
Ingredients:
makes enough to serve 2-3
Approx 1/4 of medium sized Kabocha
100g of wheat flour
dash of salt
Directions:
1) Peel Kabocha piece, chop into rough pieces and boil until soft.
2) Mix cooked kabocha with the wheat flour in a food processor. Pulse until combined. Dough should be sticky but easy to handle. Try not to overmix the dough.
3) Roll out the dough into tubes approximately 1/2inch in diameter. Let it rest in the fridge for about an hour.
4) Cut the tubes into pieces 1/2 inch in size. Roll the the tines of a fork gently across each piece to leave an impression. When ready to cook, you can cook them in salted boiling water for approximate 7min. Or you can keep them in a freezer until you're ready to use them.
Primavera
Ingredients:
serves 2-3
1cup Gnocchi (or any other pasta)
1cup cooked chicken breast, chopped (optional)
2 Red bell peppers
1bunch Broccoli
1 carrot
1 onion
1/4cup olive oil
1/4cup grated parmesan
1tbsp chopped garlic
1tbsp Herbs de Provence (or Italian herbs)
salt & pepper
Directions:
1) Preheat oven to 400degreesF. Thinly slice all vegetables and mix together with salt, pepper, herbs de provence, garlic, and olive oil in a bowl. Roast on a metal sheet pan for approximately 20 min. Giving it a good mix about half way through.
2) Cook the the Gnocchi during this time, or whatever pasta you plan to use. Drain, and then toss together with the roasted vegetables.
3) Add the chicken pieces if you'd like at this point, as well as the parmesan cheese, taste and adjust flavor with salt and pepper and you're done!
Labels:
Gnocchi,
kabocha,
savory,
squash,
vegetarian
Wednesday, May 9, 2012
Going traditional: The Japanese White Turnip
I'm sure that everyone has hankerings for a particular dishes when they are feeling tired. For me, if it's not something sweet, then I feel as if my body calls out for Japanese food - and I'm not talking about your run of the mill teriyaki chicken or california roll. I'm talking about the truly traditional - the delicate balance of flavor created by the holy trinity of ingredients used in Japanese cooking: soy sauce, sake, and mirin (sweet rice wine).
The small round white Japanese turnip has a mild delicate flavor that works well in Japanese dishes, and is full of vitamins and fiber. This particular dish called "Kabu no Nijiru" is a warm comforting side dish that is cooked along with the turnip's greens as well as with Aburaage (which is essentially thinly sliced fried tofu). The resulting dish is that delicate tradition Japanese flavor that stays true to its ingredients - for me, this is true comfort food. As for Cy, he likes it with some Shichimi (Japanese chili powder) for an extra kick ;)
I know that some of these ingredients may not be at your local grocery store, but if you are able to get ahold of these ingredients, I hope that you will have the chance to make it - it is truly delicious!
| Served with some Shiso Hijiki(seaweed) riceballs ♥ |
Ingredients:
(serves 2)
2 Japanese turnips
1piece Aburaage (fried tofu)
1cup Dashi stock
3tbsp Mirin
1.5-2tbsp Soysauce
pinch of salt
Directions:
1) Cut off the leaves of the turnips and peel. Slice into thin half moons. Leave in some water.
2) Wash the leaves and boil for about 3-4min in a pot with some salt and water. Then drain, and cut into 3-4cm pieces.
3) Prepare the aburaage by pouring boiling water on them and cut into small thin pieces.
4) In a pot, add Dashi stock, turnip and aburaage slices. Once it reaches a boil bring stove down to medium heat, add the mirin and soysauce and cook until the turnip softens. Add the leaves and cook for a few minutes more (don't let the stems of the turnips get too soft - you want it crunchy). Serve in a bowl.
Labels:
japanese,
savory,
tofu,
turnip,
vegetarian
Friday, May 4, 2012
Cabbage Spring Rolls
I must be on a spring roll kick, because I didn't even realize this recipe was actually a spring roll until I had made it. I just happened to choose this recipe because I had the ingredients on hand and because it looked easy, healthy and delicious - perfect for Cy & I, and perfect for this blog.
I feel as if Cabbage may have a reputation for being a little bit on the boring side of the vegetable world, when in fact it's one of the most versatile and healthiest foods you can eat. With not only your usual set of vitamins, Cabbage is also high in cancer-fighting anti-oxidants like polyphenol, and glucosinolates that can help keep your digestive tract in good order. Not only that but, Cabbage has a special cholesterol-lowering effect on your body. Scientists already know the exact mechanism of how this happens(you can read more about it HERE), and more recently, it has been discovered that this cholesterol-lowering effect is especially high when cabbage is steamed...which is exactly what we will be doing in this recipe.
Cabbage Spring Rolls
Ingredients:
served 2-3
4 large leaves of Cabbage
1/2 block of tofu (drained)
1/2lb ground chicken
1 tbsp grated ginger
1 tbsp chopped garlic
salt & pepper
Directions:
1) Cook the leaves of Cabbage in salted, boiled water for a few minutes so that the leaves become a little softer.
2) Blend tofu, ground chicken, ginger, garlic, some salt & pepper in a food processor until smooth.
3) Lay out a piece of Cabbage, fill the middle area with some of the filling. Roll into a skinny long log. Repeat with other pieces.
4) Steam cook for approximately 7 min. When cool enough to handle, slice into pieces and serve with some dipping sauce. ( I just mixed some Ketchup and diced tomatoes with some lemon juice, but I think it would be great with some Soy sauce also).
*I didn't do it this time around, but I think it would also be great to add some pieces of cooked shrimp and scallops in filling for some more texture.
Labels:
cabbage,
savory,
spring roll
Wednesday, May 2, 2012
Fava Bean Spring Rolls
First of all I just wanted to send out a big Thank you to the friends and readers out there who keep me motivated to continue working on this blog. I know that I've really only just begun and that this blog is still in its baby stages, but there are definitely times when work and life catches up to me and I find it hard to find the time post. But then I am reminded of how much I enjoy it - and it's all thanks to the people I ♥ :)
For some reason, Fava beans make me very happy. They have this chubby, rounded look about them that somehow reminds me of sunny skies, and childhood days. In Japanese they are called "Sora-mame" which literally means "Sky beans". Doesn't that just sound happy?
But like most good things in life, they do take a little bit of time to prep. The beans are enclosed in a thick pod, but once you take them out, you must boil them a bit to peel off the second skin surrounding each bean. A little bit time consuming, but definitely worth the extra effort. They are chock full of Vitamin A, B1 and B2. A wonderful source of energy when you're feeling a little bit down.
This recipe comes from a vegetarian cookbook called Refresh by a former Japanese model. I usually try to stay away from fried foods, but this Spring roll recipe came out amazingly light and clean tasting. Too often spring rolls are dipped in heavy sauces and filled with even heavier filling. But this one is simple, with only salt, pepper, and a squeeze of lemon, it really let's the flavor of the ingredients shine through.
Fava Bean Spring Rolls
Makes approximately 7-8rolls
3/4lbs Fava Beans
1/2 an onion (chopped)
1lb Cooked Shrimp
7-8 Spring Roll skins
salt&pepper
Lemon
Directions:
1) Take beans out of Fava bean pods. Boil for approximately 3-5min. Drain and once cool enough to handle, peel off second skin.
2) Chop cooked shrimp into bite-size pieces.
3) Take one sheet of Spring roll skin and spread out onto workspace. Lay some onions, shrimp and beans into the middle area in a horizontal line. Sprinkle with some salt and pepper. Wet the edges of the skin, and fold like a burrito to form the spring roll shape.
4) Heat some oil (I used canola) in a pan and fry the spring rolls on each side for approximately 2-3min or until well browned.
5) Let it dry off on some paper towels and enjoy with a squeeze of lemon!
Labels:
Fava beans,
savory,
shrimp,
vegetarian
Subscribe to:
Posts (Atom)